The Visual Studio Environment
Before using Visual Studio you must understand the VS environment. The environment refers to how VS manages programs and what support tools are found with VS.
When creating a Visual Studio application you will be working with Projects. A Project consists of a collection of files that are contained in a folder that has the project name. For example, if you want to create a Visual Basic application you must first create and name a Project. Within the Project will be contained the files that make up the application. Each file may have it's own name.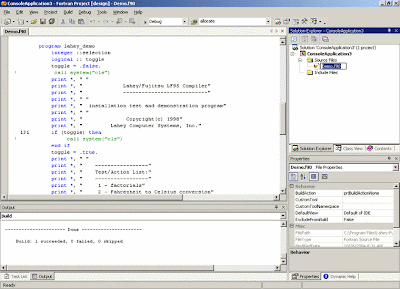
When you first start Visual Studio you will see the window like Figure 1.You can create a new project or select an existing project. Some of the previously saved projects are listed and can be directly selected.
When you create a new project you will be asked to assign a project name:
Before selecting a project name and location you should choose the kind of project you want to create. The Project Types area of this dialog box lists the various kinds of Visual Studio projects that can be created and the Templates area list, for each project type, the specific kinds of projects. For example, if you select Visual Basic Projects on the left side of the screen you can then choose the kind of Visual Basic program you want to create in the list on the right hand side of the screen. The most common type selected with be Windows Application.
Select the location of the project (where you want the project folder created) and type a name. When you click OK a folder with the project name is created at the specified location.
If you selected a Windows Application you will see a basic GUI screen:
The screen is divided into three areas. The main area to the left is the GUI design area and is where you design the program GUI elements and write the code. This area will contain a set of tabbed pages with titles across the top. The right side of the screen is divided into two smaller blocks. The top block is the Project Explorer area and lists all the files that makeup the project. When you create new forms or modules they will be created in this area and edited in the main part of the screen. The upper right area can also display help information. The lower block on the right side of the screen displays property information about elements as they are created.
In the far right section of the menu bar at the top of the screen you see five small icons that, when clicked, display the various windows elements. If a window element is closed it can be redisplayed by clicking one of these icons. Moving the mouse over the icon displays what it does.
As you work in the main window, you may have multiple tabbed windows open. If the title bar of a tabbed window contains a * character, this indicates that it needs to be saved. You can select the window and choose File/Save or press Ctrl S to save the window. You can save all the windows at once by choosing File/Save All or pressing Ctrl Shift S.
To the left of the main window you may see the toolbox. If you don't see the toolbox, move the mouse over the toolbox tab and it will pop into the screen. Click the pushpin icon at the top of the toolbox to keep it displayed on the window.
You can choose other toolbox elements by clicking the toolbox name at the top of this window.
Before using Visual Studio you must understand the VS environment. The environment refers to how VS manages programs and what support tools are found with VS.
When creating a Visual Studio application you will be working with Projects. A Project consists of a collection of files that are contained in a folder that has the project name. For example, if you want to create a Visual Basic application you must first create and name a Project. Within the Project will be contained the files that make up the application. Each file may have it's own name.

When you first start Visual Studio you will see the window like Figure 1.You can create a new project or select an existing project. Some of the previously saved projects are listed and can be directly selected.
When you create a new project you will be asked to assign a project name:
Before selecting a project name and location you should choose the kind of project you want to create. The Project Types area of this dialog box lists the various kinds of Visual Studio projects that can be created and the Templates area list, for each project type, the specific kinds of projects. For example, if you select Visual Basic Projects on the left side of the screen you can then choose the kind of Visual Basic program you want to create in the list on the right hand side of the screen. The most common type selected with be Windows Application.
Select the location of the project (where you want the project folder created) and type a name. When you click OK a folder with the project name is created at the specified location.
If you selected a Windows Application you will see a basic GUI screen:
The screen is divided into three areas. The main area to the left is the GUI design area and is where you design the program GUI elements and write the code. This area will contain a set of tabbed pages with titles across the top. The right side of the screen is divided into two smaller blocks. The top block is the Project Explorer area and lists all the files that makeup the project. When you create new forms or modules they will be created in this area and edited in the main part of the screen. The upper right area can also display help information. The lower block on the right side of the screen displays property information about elements as they are created.
In the far right section of the menu bar at the top of the screen you see five small icons that, when clicked, display the various windows elements. If a window element is closed it can be redisplayed by clicking one of these icons. Moving the mouse over the icon displays what it does.
As you work in the main window, you may have multiple tabbed windows open. If the title bar of a tabbed window contains a * character, this indicates that it needs to be saved. You can select the window and choose File/Save or press Ctrl S to save the window. You can save all the windows at once by choosing File/Save All or pressing Ctrl Shift S.
To the left of the main window you may see the toolbox. If you don't see the toolbox, move the mouse over the toolbox tab and it will pop into the screen. Click the pushpin icon at the top of the toolbox to keep it displayed on the window.
You can choose other toolbox elements by clicking the toolbox name at the top of this window.


No comments:
Post a Comment